Install and use, step by step
SignalForge systems can be used two ways: trade it yourself, or let the bot trade for you. Pick yours and follow its steps; each system page lists its own markets and chart timeframe.
Trade it yourself
The TradingView indicator shows entry, stop, target and lot size; you place the trade at your broker.
- NeedsTradingView (free works) + a broker account
- TimeCheck when an alert arrives
- SuitsPeople who want to decide every trade
Let the bot trade
The bot opens, manages and closes trades from the signals. No screen-watching.
- NeedsAn MT5 account + a machine that stays on (VPS)
- TimeRead the report once a day
- SuitsPeople without screen time
Pick a system
Pick by what fits you: your time (H4 charts give few signals, once a day is enough; H1 or lower give more), the markets you want, and the risk you can take (see max drawdown and losing streak on each system page). Systems can be combined.
| System | How it runs | Markets | Chart |
|---|---|---|---|
| Ichimoku MTF | Automated bot | XAUUSD · USDJPY · EURJPY · GBPJPY | H1 |
| XAUUSD Trend Rider | Automated bot | XAUUSD | H1 |
| Gold Breakout Signal | Manual | XAUUSD | H4 |
| Gold H1 Signal | Manual | XAUUSD | H1 |
| Gold Swing Signal | Manual | XAUUSD | H4 |
| Ichimoku MTF เทรดมือ | Manual | XAUUSD · USDJPY · EURJPY · GBPJPY | H1 |
| Quant Prototype | Add-on / research | USDJPY · XAUUSD · GBPUSD · NAS100 | M1 decisions · hourly holds |
| Supertrend MTF | Add-on / research | XAUUSD · USDJPY · EURJPY · GBPJPY | H1 |
| USD News Radar | Add-on / research | XAUUSD | M1–M5 |
Sorted by type, then name. Every system's results are on All systems
Trade it yourself (indicator on TradingView)
Install the indicator, read the signals, set alerts, and place trades at your own broker.
1Install on a computer
A step-by-step install video is being recorded. Until then, follow the steps below.
- Contact us for the script of the system you picked; we send the code or grant your TradingView account access. Contact us
- Open TradingView and pick a market the system supports, e.g.
OANDA:XAUUSD(use an OANDA or FX feed, the same data the tests use) - Set the chart timeframe to the one on the system page, e.g. H1 or H4 (the test results only hold on that timeframe)
- If you received code: open the Pine Editor tab at the bottom → paste all the code (Ctrl+A, then Ctrl+V) → click Save → Add to chart
- If you were given access: click Indicators → Invite-only scripts (or My scripts) → pick the script
- Click ⚙ next to the script name → enter your account balance (USD) so lot sizes are right → OK
- If the panels cover the chart, hide them in the script's ⚙ settings
2Use on iPad / phone
- Install once on a computer first (steps above); the script is tied to your TradingView account.
- Open the TradingView app with the same account → tap fx → My scripts / Invite-only → pick the script
- Turn the screen sideways so the panels don't overlap
- Panels not showing: tap the script name top-left → Show; if there is a ❗, close and reopen the app.
3Read the labels and panels
Every system marks the entry and stop (and target where it uses one) on the chart. The panels usually have these rows; names vary slightly by system.
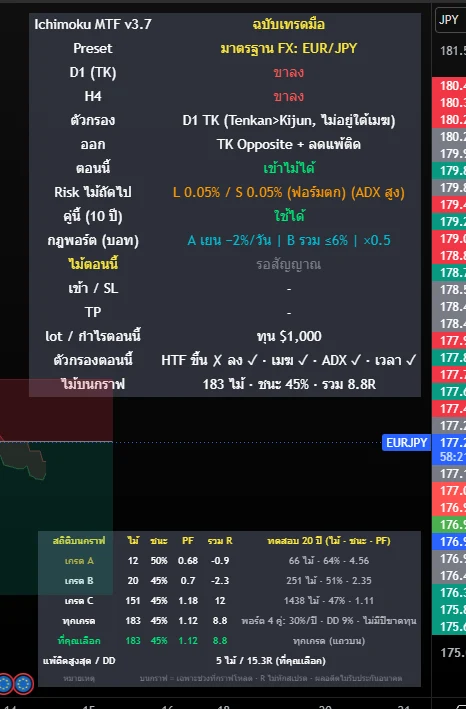
- Trend
- Direction from the higher timeframes; trades follow it
- Now
- Whether trades may open now (some systems skip certain hours)
- Next trade risk
- Risk for the next trade; orange = the system reduced it
- Open trade / lot
- Entry, stop and target of the open trade, and the lot for your balance
- Filters
- ✓ pass ✗ fail; every filter must pass for a signal
- Stats / losing streak
- Chart results vs the test, and the current losing streak vs the record
Some systems grade signals (e.g. A / B / C) by confidence and size the risk to match; you can show only the grades you want in ⚙.
4Set alerts (no screen-watching)
- On the chart with the script, click Alert (alarm clock)
- Condition: pick the script name → Any alert() function call
- Notifications tab: turn on Notify in app (phone push) and/or email
- One alert per market; messages say exactly what to do: open / move the stop / close.
The free TradingView plan allows a limited number of alerts; several markets may need a paid plan.
5A real trade, step by step
A video of a live run, from signal to close, is coming. Until then, see the example below.
- 2025-12-21 23:00 — Signal: the BUY label shows entry 4355.42, SL 4329.66 (distance 25.76 $)
- Lot size: $10,000 at 1% risk = $100 ÷ stop distance 25.76 $ ÷ 100 oz = 0.04 lot — the panel does this for you
- Open the Buy at your broker with the stop from the label (and the target, if the system uses one)
- While holding: when an alert says “move SL”, move it
- 2025-12-24 15:00 — The “close” alert → closed at 4458.49 = +4R (risked $100, made about $400)
Not every trade looks like this; every system has losing trades. Each system page shows its win rate and longest losing streak, with a chart for every trade. See all systems
6Common problems (trading yourself)
The panels sometimes don't show
Update to the latest script version first. If they still don't show: check the script isn't hidden (eye icon), has no red ❗, and the chart matches the system's timeframe.
A wrong-timeframe warning
Switch to the timeframe on the system page; the warning disappears. Entries and stats on other timeframes don't match the tests.
The lot is below 0.01
The balance is small for the stop distance: skip that trade or use an account with micro lots. Never trade bigger than the calculated lot.
Does the free TradingView plan work?
Yes, signals and panels work fully. Limits are indicators per chart and the number of alerts.
Let the bot trade (MT5)
For systems marked “Automated bot” in the table above. The bot handles every trade.
1What you need
An MT5 account
With a broker that offers the system's markets. Start on demo.
A machine that stays on
A VPS or a computer on 24 h; the bot must be online while markets are open.
Telegram
Receives the bot's reports: opens, closes and summaries.
2Set up the bot
Until then, follow the steps below or let us set it up with you.
- Pick a system marked “Automated bot” and contact us for the bot files and that system's settings. Contact us
- Install MT5 on the VPS and log in to the demo account
- Attach the bot to a chart as in the instructions you receive, then set the risk per trade
- Connect Telegram for reports and check a test message arrives
- Let it run on demo for at least 1–3 months before real money
3While it runs
- Reading the Telegram report once a day is enough
- Don't close or edit the bot's trades; it moves stops and exits by the rules. Stepping in breaks the match with the stats
- Compare with the system page now and then: return, drawdown and losing streaks
Always start on demo, and pick a risk per trade you could live with through the longest losing streak shown on the system page.
4Common problems (bot)
What if the VPS or computer goes off?
Open trades keep the stop already placed at the broker, but the bot won't open new trades or move stops until it is back online, which is why a VPS is best.
What is the minimum balance?
It depends on the system and markets, because the smallest lot is 0.01; too small a balance means more risk than intended. Ask us first. Contact us
Which brokers work?
Any MT5 broker that offers the system's markets. Results can differ slightly with the broker's spread and commission.
Which system should I use?
It depends on your time and risk. Every system page breaks results down by market and year, with losing streaks, so they compare directly. Still unsure? Message us. Contact us